Google Maps API Tutorial© 2007, 2008, 2009 Mike Williams |
| Translate this page: |
Using the EBubble extensionThe EBubble extension provides an alternative to custom info windows.You can use EBubbles in a similar manner to info windows, but the technology is completely different, and causes significant differences in the behaviour.
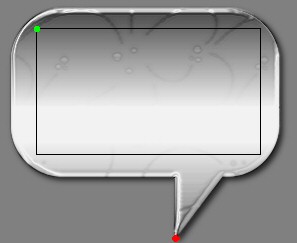
The background image for that EBubble was created in PaintShopPro using a simple speech bubble object. I applied the Inner Bevel effect to make it look a little 3D, added a central drop shadow, and gave the whole image partial transparency. The basic procedure for using an EBubble is:
EBubble ConstructorThe parameters for new EBubble() are:
Specifying noCloseOnClick may sometimes cause strange click-through behaviour, but it might improve things if you're experiencing problems with clickable elements inside your EBubble contents. Opening an EBubbleThere are two methods provided for opening an EBubblebubble.openOnMap
This opens the EBubble on the map that you specified in the EBubble constructor.
bubble.openOnMarker This opens the EBubble on the map that you specified in the EBubble constructor, with a location derived from the specified marker.
This call uses the infoWindowAnchor parameter of the icon that is being used by the marker.
Multiple EBubblesYou can have as many EBubbles as you like on the same map.You can use different background images for different EBubbles. Closing an EBubbleUse bubble.hide()The EBubble wil also close automatically if the map moves or if the user clicks on the EBubble. I provide a bubble.show() method, but I don't recommend using it, because it doesn't track map movements. If you want to re-open the bubble, use .openOnMap() or .openOnMarker() again. EventsWhen an EBubble is clicked, it throws a "click" event.More About The ParametersConsider this bubble image:
While creating the image, I recorded the following information: The total size of the image is (297,243), which makes the 3rd parameter new GSize(297,243) The contents go in the rectangular area marked by the black box. The size of the box is (224,126), which makes the 4th parameter new GSize(224,126) The green dot indicates the position of the black box. It is located at (36,28), which makes the 5th parameter new GPoint(36,28) The red dot at the tip of the stem is the point which will be anchored to the map location. It is located at (175,238), which makes the 6th parameter new GPoint(175,238) Here's an example which uses that image. CreditsInspired by the Radio Shack Store Locator: www.radioshack.com/storeLocator3 (but not using any of their code) (I couldn't understand it). |
